How I rebuilt this site
I’m increasingly convinced that “niching down” is the best writing strategy, and that if you come across a technical post, it is helpful if it is truly in depth.
Although it’s been a few years since I used Hugo, when I came across Julia Evans’ post I bookmarked it:
Warning: this is a post about very boring yakshaving, probably only of interest to people who are trying to upgrade Hugo from a very old version to a new version. But what are blogs for if not documenting one’s very boring yakshaves from time to time?
So here is my contribution to the genre. For this site nickromney.com, I had been using Eleventy with the Eleventy Excellent theme by Lene Saile.
Looking at the package.json, I was still using version 1.6.0 which required Node version 16 or above, whereas the most recent version is 4.1.7, and uses Node above version 20
I had last seriously updated my blog in January 2024, and missed out on 3 sets of updates:
- version 2.0 from 1 February 2024, which introduced dark mode and integrated tags
- version 3.0 from 3 June 2024, which updated the config location
- version 4.0 from 11 January 2025, which had many breaking changes particularly around image handling
Approach
- Get version 4.0 working locally
- Create your own copy of the code
- Apply customisations and port previous content
- Deploy with a Cloudflare Pages CI/CD workflow
Get version 4.0 working locally
Note that this is a “belt and braces” approach, of first proving that the code works locally, before creating a copy of the code. If you are happy to take my word on it, you can skip to the next section
Set up the dependencies
You can see from my dotfiles the various tools I use. Especially as we might be hopping back and forth between Node versions 16 and 20, I am grateful for nvm - Node Version Manager
npm (Node Package Manager) is bundled with nvm. If we want a newer version, then
nvm install 20
nvm use 20
npm install -g npm@latest
Set up a local area in which to work
I like to create a ~/Developer directory, as on MacOS it gets a handy icon.
mkdir -p "$HOME/Developer"
cd "$HOME/Developer"
And then further I differentiate between personal and work.
mkdir -p personal
cd personal
Clone the repository
Clone the repository. On my cicdpipelines.com website, I go through how to clone with https or SSH. If you follow that post, you know that I much prefer SSH for working with Git, and being able to sign commits.
git clone [email protected]:madrilene/eleventy-excellent.gitBuild locally
cd eleventy-excellent
npm install
If we look at the scripts block in package.json we see:
  "scripts": {
    "clean": "rimraf dist src/_includes/css src/_includes/scripts",
    "clean:og": "rimraf src/assets/og-images",
    "favicons": "node ./src/_config/setup/generate-favicons.js",
    "colors": "node ./src/_config/setup/create-colors.js",
    "screenshots": "node ./src/_config/setup/generate-screenshots.js",
    "dev:11ty": "cross-env ELEVENTY_ENV=development eleventy --serve",
    "build:11ty": "cross-env ELEVENTY_ENV=production eleventy",
    "start": "npm run dev:11ty",
    "build": "npm run clean && npm run build:11ty"
  },
So run:
npm run buildWe should then see lots of output, concluding with
[11ty/eleventy-img] Processing ./src/assets/images/gallery/asturias-1.jpg (transform)
[11ty] Writing ./dist/blog/post-with-an-image/index.html from ./src/posts/2025/2025-01-09-post-with-image/post-with-image.md (njk)
[11ty/eleventy-img] 82 images optimized (13 cached)
[11ty] Copied 28 Wrote 67 files in 32.30 seconds (482.1ms each, v3.0.0)
At which point we can run:
npm run startThe output should conclude:
[11ty/eleventy-img] Processing ./dist/assets/og-images/what-is-tailwind-css-doing-here-preview.svg
[11ty] Watching…
[11ty] Server at http://localhost:8080/
If we open the link http://localhost:8080/ we should see the same site as the Eleventy Excellent Netlify site.
If we edit the file src/posts/2025/2025-01-11-v-4.md, we can update the description in line 3:
description: "My local edit. Time for a new version with a lot of breaking changes! Have fun everybody."Then in the terminal output, we should see
[11ty] Watching…
[11ty] File changed: src/posts/2025/2025-01-11-v-4.md
And in the browser the homepage will have updated
In the terminal, use Ctrl+C to stop serving the local website
Create your own copy of the code
Now that we know the code works, we can create a copy of the code in our GitHub.

In this screenshot we can see that 88 people have already Forked the repository, and 467 have Starred it.
Lene (the author) has marked the repository as a template, so we can follow the GitHub instructions on creating a repository from a template
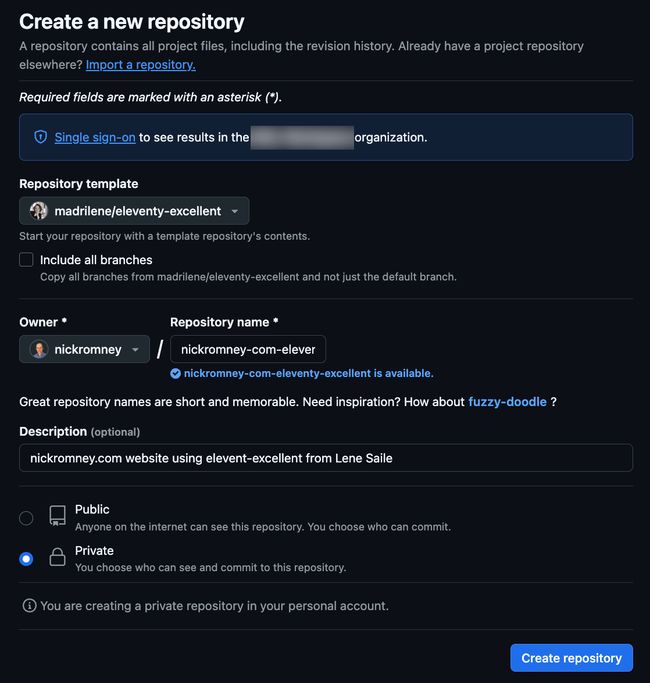
I’ve chosen to create a private repository called nickromney-com-eleventy-excellent in my personal account.
Repeat the earlier steps of cloning, installation and building
Note as my repository is marked private, you will have to replace nickromney/nickromney-com-eleventy-excellent.git with your copy of the template.
cd ~/Developer/personal
git clone [email protected]:nickromney/nickromney-com-eleventy-excellent.git
cd nickromney-com-eleventy-excellent
npm install
npm run build
npm run start
Ctrl+C to exit out of serving locally
Apply customisations and port previous content
We are almost ready to follow the instructions in get started.
Create a short-lived feature branch
From several years of having to work this way professionally, even if I’m the only one working on a project, I default to creating a short-lived feature branch, and as far as possible, to using Conventional Commits
Create the branch with
git switch -c chore/20250424-initial-customisationEdit the files mentioned, plus also src/_data/github.js
At the end of src/_data/meta.js, I turned off the GitHub link and Easter Egg confetti:
export const viewRepo = {
  // this is for the view/edit on github link. The value in the package.json will be pulled in.
  allow: false,
  infoText: 'View this page on GitHub'
};
export const easteregg = false;
At this point, if you run git status you should see something like
On branch chore/20250424-initial-customisation
Changes not staged for commit:
  (use "git add <file>..." to update what will be committed)
  (use "git restore <file>..." to discard changes in working directory)
        modified:   src/_data/github.js
        modified:   src/_data/meta.js
        modified:   src/_data/personal.yaml
        modified:   src/assets/css/global/blocks/external-link.css

no changes added to commit (use "git add" and/or "git commit -a")
Run
git add .
git commit -m "chore: initial customisation"
git push
My output is:
Enumerating objects: 23, done.
Counting objects: 100% (23/23), done.
Delta compression using up to 8 threads
Compressing objects: 100% (12/12), done.
Writing objects: 100% (12/12), 1.38 KiB | 1.38 MiB/s, done.
Total 12 (delta 9), reused 0 (delta 0), pack-reused 0 (from 0)
remote: Resolving deltas: 100% (9/9), completed with 9 local objects.
remote:
remote: Create a pull request for 'chore/20250424-initial-customisation' on GitHub by visiting:
remote:      https://github.com/nickromney/nickromney-com-eleventy-excellent/pull/new/chore/20250424-initial-customisation
remote:
To github.com:nickromney/nickromney-com-eleventy-excellent.git
 * [new branch]      chore/20250424-initial-customisation -> chore/20250424-initial-customisation
branch 'chore/20250424-initial-customisation' set up to track 'origin/chore/20250424-initial-customisation'.
And from my terminal I can click the suggested link to create a Pull Request
At that point, I can Merge the Pull Request, then Delete the branch
Back on the local terminal
git switch main
git switch pull
Yes, this is exactly what I do, even when no-one is watching.
Remove unneeded posts
From what can be deleted we read
If you want to keep the defaults, but get rid of the example content, delete the following files and archives:
- github.js in src/_data/
- builtwith.json in src/_data/
- all files in src/posts
- the directory and all files in src/docs
- all pages in src/pages, though you might want to keep index.njk as a starting point
- You can delete screenshots, blog and gallery in src/assets/images.
- Keep the favicon and template folders though.
I want to later edit builtwith.json to profile my own projects
My git commands were:
git switch -c chore/20250424-initial-deletion
git rm src/pages/get-started.md
git rm src/pages/styleguide.njk
git rm src/posts/2022/*
git rm src/posts/2023/*
git rm src/posts/2024/2024-01-30-gallery.md
git rm src/posts/2024/2024-02-01-v-2.md
git rm src/posts/2024/2024-06-03-v-3.md
git rm src/posts/2024/2024-07-21-draft.md
Add my own posts
I had a couple of posts for 2024, so moved them under src/posts/2024
- src/posts/2024/2024-01-05-aks-course-launch-1.md
- src/posts/2024/2024-01-12-do-I-need-a-further-cloud-certification.md
Run
npm run startWork with Open Graph images
When we run npm run start, we see that two additional images are created, for Open Graph
[11ty/eleventy-img] Processing ./dist/assets/og-images/how-hard-can-it-be-to-write-an-educational-course-preview.svg
[11ty/eleventy-img] Processing ./dist/assets/og-images/open-graph-images-preview.svg
This is determined by src/common/og-images.njk
I took away the SVG representation of the 11ty logo, and updated the beginning to:
fontDisplay: "'Red Hat Display', Ubuntu" # needed created in local development, font must be installed on your system.
fontBody: "'Atkinson Hyperlegible', Ubuntu" # needed created in local development, font must be installed on your system.
background: "#FBBE25"
text: "#161616"
siteUrl: "www.nickromney.com"
Adjust header and footer
For the header, I want to:
- customise the list of pages
- change “Blog” to “Writing”
- remove “Built with”
For the footer, I want to:
- remove the link to the “Style guide” page we removed with
git rm src/pages/styleguide.njk - remove the version number from the site - “Nick Romney 4.1.7” makes less intuitive sense than “Eleventy Excellent 4.1.7”
In src/_data/navigation.js, we can update the navigation for the header and the footer, even before the pages exist
export default {
  top: [
    {
      text: 'Now',
      url: '/now/'
    },
    {
      text: 'Building',
      url: '/building/'
    },
    {
      text: 'Certifications',
      url: '/certifications/'
    },
    {
      text: 'Writing',
      url: '/writing/'
    },
    {
      text: 'Hire Me',
      url: '/hire/'
    }
  ],
  bottom: [
    {
      text: 'Imprint',
      url: '/imprint/'
    },
    {
      text: 'Privacy',
      url: '/privacy/'
    }
  ]
};
In src/_includes/partials/footer.njk, update line 7 from
><span class="font-display">{{ meta.siteName }}</span> <small>{{ pkg.version }}</small>to
><span class="font-display">{{ meta.siteName }}</span>In src/pages/legal.md and src/pages/privacy.md, remove the line
Edit your details in `_data/personal.yaml`Replace Blog with Writing
This is my own personal choice, as it includes links to Writing I may have done elsewhere, possibly a book in time.
git mv src/pages/blog.njk src/pages/writing.njkAnd making writing.njk
---
layout: base
title: Writing
description: 'All writing'
pagination:
  data: collections.allPosts
  size: 8
permalink: 'writing/{% if pagination.pageNumber >=1 %}page-{{ pagination.pageNumber + 1 }}/{% endif %}index.html'
---

<div class="wrapper">
  <header class="full | section" style="--spot-color: var(--color-secondary)">
    <div class="section__inner flow region" style="--region-space-top: var(--space-xl-2xl)">
      <h1 class="text-center" style="color: var(--color-light);">{{ title }}</h1>
    </div>

    {% svg "divider/edgy", null, "divider" %}
  </header>

  <div class="region flow prose" style="--region-space-top: var(--space-xl-2xl)">
  </div>

  <custom-masonry layout="50-50">
  {% asyncEach item in pagination.items %}
   {% include "partials/card-blog.njk" %}
  {% endeach %}
 </custom-masonry>

  <!-- set collection to paginate -->
  {% set collectionToPaginate = collections.posts %}
  <!-- set target pagination settings in meta.js -->
  {% set metaKey = "blog" %}
  <!-- if the number of items in the collection is greater than the number of items shown on one page -->
  {% if collectionToPaginate.length > pagination.size %}
    <!-- include pagination -->
    {% include 'partials/pagination.njk' %}
  {% endif %}
</div>
Edit the index (home) page
Edit the src/pages/index.njk for the content you want on your home page, especially the title in the YAML frontmatter.
Add and Delete Pages
git rm src/pages/about.md
git rm src/pages/sustainability.md
At this point our pages are a mixture of Nunjucks and Markdown
- built-with.njk
- index.njk
- legal.md
- privacy.md
- writing.njk
We have complete freedom which style to add.
I want building rather than built-with, as for a personal site, it’s what I’m building, rather than how this project is being used by others.
git mv src/pages/built-with.njk src/pages/building.njkI copied over the pages to match my top navigation, plus /uses, so the full list is
- building.njk
- certifications.md
- hire.md
- index.njk
- legal.md
- now.md
- privacy.md
- uses.md
- writing.njk
Deploy with a Cloudflare Pages CI/CD workflow
This assumes that you have a Cloudflare account.
Once logged in:
- go to “Compute (Workers)”, then “Workers & Pages”
- click “Create”
- choose “Pages”
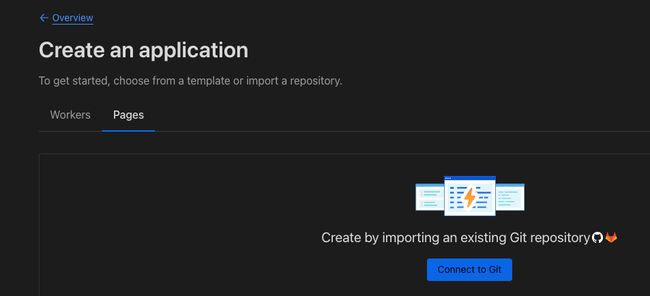
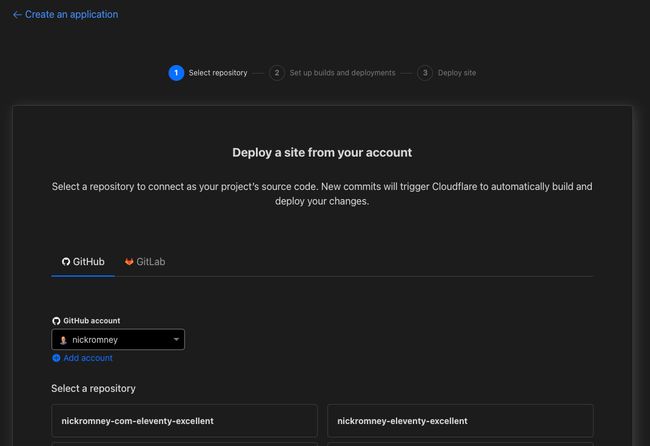
Select from among the GitHub repositories you have authorised Cloudflare to see:
Fill in the build settings
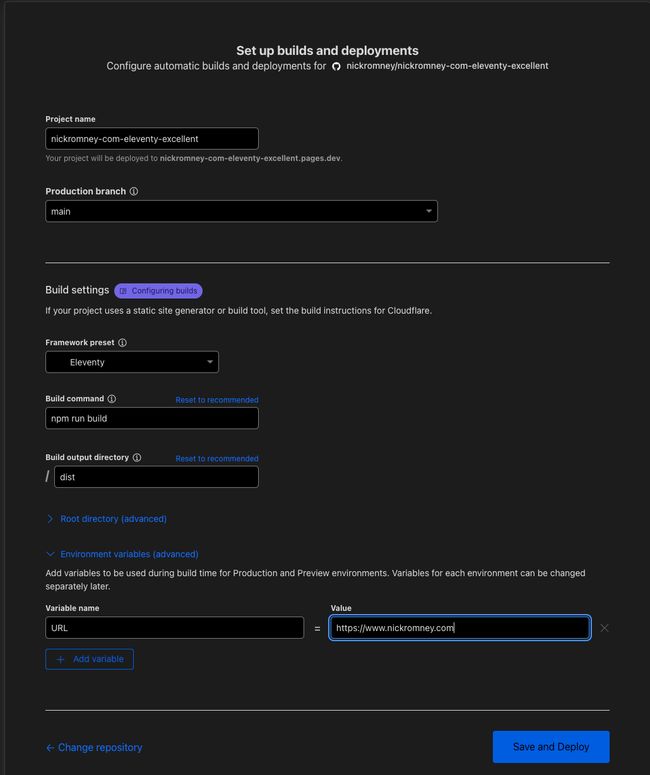
Especially:
“build command”
npm run buildand
“build output directory”
distWe add the variable name URL with the value https://www.nickromney.com
Click “Save and Deploy”
The end of the logs says
20:57:22.199 [11ty] Writing ./dist/tags/writing/index.html from ./src/common/tagList.njk
20:57:22.200 [11ty/eleventy-img] 8 images optimized (2 cached)
20:57:22.201 [11ty] Copied 43 Wrote 112 files in 7.02 seconds (62.7ms each, v3.0.0)
20:57:22.287 Finished
20:57:23.171 Checking for configuration in a Wrangler configuration file (BETA)
20:57:23.171
20:57:24.274 No wrangler.toml file found. Continuing.
20:57:24.275 Note: No functions dir at /functions found. Skipping.
20:57:24.275 Validating asset output directory
20:57:27.086 Deploying your site to Cloudflare's global network...
20:57:29.586 Uploading... (0/176)
20:57:30.673 Uploading... (59/176)
20:57:30.794 Uploading... (117/176)
20:57:31.246 Uploading... (176/176)
20:57:31.246 ✨ Success! Uploaded 176 files (2.44 sec)
20:57:31.246
20:57:31.731 ✨ Upload complete!
20:57:35.258 Success: Assets published!
20:57:36.911 Success: Your site was deployed!
Give it a few minutes for the DNS to resolve, and check the site with its .pages.dev suffix: https://nickromney-com-eleventy-excellent.pages.dev/
Then set (or update) the CNAME with a proxied target of nickromney-com-eleventy-excellent.pages.dev
From the [https://developers.cloudflare.com/pages/configuration/build-image/#supported-languages-and-tools](supported languages and tools page) we see that Node by default is 18.17.1 and we need version 20 or above.
We’ve been working with 20.19.1, so we will add another variable with name NODE_VERSION which should be picked up on the next deployment.
Set the custom domain
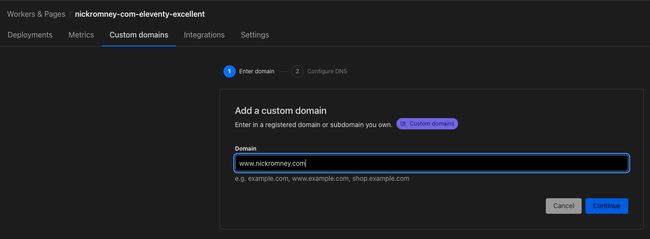
I choose to add two - the “naked” domain, and with a www. prefix.